Monday, 19 November 2012

How does I draw it?

Ran into a rather interesting problem this week, it involves finding the common (outer) tangents of two circles, but more on that in a bit. First lets look at why.
You have a bunch of Nav-Circles all set up neatly on a map, but all you can see are the circles.

 Indeed drawing circles on a computer screen is only a small jump and a bit of maths from drawing a triangle so that need not be the issue, the issue is what you should see between the circles. If you look at my previous examples (and the one below) you will no doubt notice that all the walk-able areas are draw (in Inkscape's beautiful list of default colours), and that was pretty easy doing it all by hand.

I naively figured that it would be pretty simple to get the computer to do the same; all the information's there, it's just a bit of vector maths, how hard could it be? It turns out to be a non trivial task if you're on the wrong track, thankfully I have a teacher at hand to solve the problem in five minutes and make me look incompetent.
So what's the solution? Maybe I'll start with...
The problem:
Find t where t is the vector that shares a common outer tangent with two circles that have centre positions at A and B respectively and radii of R and r.
First we find the vector from A to B (we'll call this vector D for difference), so D = B - A


What we want to do is normalize D, rotate it by a certain angle, scale it by R and add A to find the point P (shown bellow), as well as scale it by r and add B to find point Q


The problem now is finding the angle to rotate by, let's denote the angle with the Greek letter Omega. By projecting a line from B onto the line AP, we can form a helpful little triangle. The triangle's sides have lengths: (R - r), |t| and hypotenuse |D|.

Using the Pythagorean theory we can at least find out the length of t


But that's not all that helpful, but what we can use is SOH CAH TOA to find omega, we know the Adjacent length (R-r) and the Hypotenuse (|D|) so
(or if you're an idiot like me you'll use arcsin( |t|/|D|) and not notice your gratuitous scheme until you're writing a web-log post on it)

Excellent, now we can find the points P and Q, you also only need to draw one line PQ (or if you want filled in square, PQAB) for each of each circle's neighbours. When the line is drawn from the blue circle it will be on top, and when coming from pink, it will be on the bottom (or vice-versa depending on exact implementation).

Monday, 12 November 2012

Am I closer to that one, or that one?

In a map full of way-points, it's pretty easy to find which one you're closest to. All you need to do is look at each node one by one and keep track of which one's closest. With circles it's a bit less obvious; consider the following scenario:

Which circle is Bob closer to? As the crow flies he's closer to the centre of B, but it would make more sense to say A is the closer circle. The solution to this is rather trivial, we need to search for the smallest distance relative to each circles radius, i.e. Distance/Radius instead of just Distance.

Here's another issue that can pop up, consider the following:
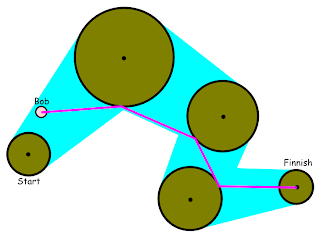
Notice that Bob first goes back to the starting Circle despite having clear line of sight on the second? This can be fixed. When receiving the path simply compare the distance from Bob to the second Circle with the distance between the first and second. If Bob is closer then remove the first circle.
This also auto magically fixes another issue involving the target destination being between the same two circles as Bob.

Sunday, 11 November 2012

Following the yellow blip road

Following up, how does one take advantage of the great new object that is the circle? It's pretty damn easy if you have a bit of know how, you don't even have to change anything in your path-finding system; you only need to change some things about in the AI. So lets begin.
Start with an a character that we want to follow the path, we'll call him Bob. Bob retrieves a list of circles from the full set, this list consist of the circles he should follow in order.

Middles Only
Bob moves towards the next circle in his list, when he reaches the centre of the circle he pops that circle from the front of the list.

This gives a rigid path that looks exactly like a path made from way-points, so in other words, like crap (unless Bob is a robot [or perhaps a patrolling guard]).

Closest First
Gets a shorter path than the 'Middles Only' algorithm, albeit it sounds pretty much the same.
Bob moves towards the next circle in his list, when he reaches the edge of the circle he pops that circle from the front of the list.

Doesn't that look better already? Also notice that in following this algorithm, Bob will never leave the designated areas we've set out for him.

Closest Last
Watch out! Vector maths ahead! Or at least you need to pay special attention to my words.
Bob moves towards the point on the firsts circle in his list that is closest to the second. When he reaches the point he pops the first circle from the list.
How do we find this point? Glad you asked, it's super simple. Lets say the first two circles in Bob's list are called A and B respectively. First we get the vector that goes from A to B which is of course (B - A), normalize that vector, then multiply that by A's radius.
This gives the equation:
||B.p - A.p|| * A.r

For those visual thinkers:


Closest To Closest Last
Not quite as tricky as it sounds, it's kind of a mix of the previous two.
Bob moves towards the point on the firsts circle in his list that is closest to the second. When he reaches the edge of the circle he pops the first circle from the list.
Overlaid on top of Closest Last to give you a better idea

This is about the shortest path I've been able to find, so it'd be great for something fleeing a rampaging monster, or Bob when you tell him this is how he has to get around from now on.

Saturday, 20 October 2012

Navigating Circles

In my short time as a game developer I've come across a number of way to represent accessible areas for AI on a map. However I'm yet to find way quite like this one, perhaps there's something inherently wrong with the technique that I've overlooked. Nevertheless I'd like to shed some light on it, but first lets take a quick look at some the other methods.

Grids

Grids are just about as simple as you can get when it comes to navigation, a section of map (or the whole map) is subdivided multiple times providing a lovely grid of squares, the centre of each square represents a walk-able point (alternatively you can use the corners of each square). Actors in the world are able to move between neighbouring squares. The problem here is you end up with a jaggy unnatural looking path. Some techniques can be used to then simplify that path, and using some spiffy interpolation and curve generation you can fix it up to look quite nice, but who the hell wants to waste time implementing that?

Waypoints (nodes)

An improvement from grids (unless you're making X-Com), Waypoints represent arbitrary locations for where actors can travel. One way or bidirectional edges are drawn between nodes allowing actors to move between them. Actors are considered to 'arrive' at a node when they get to within a certain distance (a fixed radius around the node). They're great for level editors (the person not the tool) as they give great control. Despite their advantages, they do have the problem of not being able to cover large areas without reverting back to a grid.

 Nav-Meshes

One of the more complex implementations. Nav-meshes are pretty cool (just say'n) ; you can easily define and edit large, shifting and maze-like traversable areas, not limited to single points. Put as simply as I can, a mesh (much like one you'd use for a 3D model) is first laid out on a map, actors are only allowed to walk on the mesh. Coding 'good' path-finding for nav-meshes is reserved for people with neck beards. Strange witchcraft is applied to the mesh to give you a sequence of points then various curves need to be calculated to get a nice smooth path; it can be difficult to understand and implement. If you do a poor job at implementing your path find then you'd just about be better off going back to way-points like the little girl you are. Also making a nav-mesh to begin with can be a massive pain, do you get an artist to manually model a mesh for walk-able areas manually (not great because they could end up making something horrid and or high poly) or do you implement some kind of procedural algorithm to fill out a map (if you're a leet haxor and have afore mentioned neck-beard). There are also tools available to help you build and use nav-meshes if you don't want to do all that heavy lifting yourself.

Variably sized waypoints (or circles)
I really find it odd that I haven't seen any documentation or hint that someone else has used this technique before. Basically it's waypoints, but each node is given its own radius to determine whether or not it has been reached. What's the advantage of this? Isn't it obvious? To show you properly, lets have a look at the walk enabled areas normal waypoints provide:

And then circles:

How is this so? Magic that's why.
The advantage of circles? Well, you can cover large areas much like you can with a nav-mesh, and with that you get the simplicity (in both use and implementation) of just regular way points. Plus it's pretty easy to get your AI to follow nice smooth dynamic paths about the terrain, but I'm still writing that blog post.

Sunday, 10 June 2012

Axis Aligned Bounding Boxes and Collisions

(Warning: this article may confuse and disorient you if you are not mathematically inclined)
If you've ever tried to make a physics based game or even a simple platformer, then you've no doubt encountered axis aligned bounding boxes (aabb). An aabb is as the name implies a box that is permanently aligned to all axis. (Wikipedia gives a rather lacking description of an Aabb)
Yay pretty diagrams
aabbs are so convenient for video games and macro physics because a) they can be defined by just two points (max and min) and b) because you can do some super fast collision detection on them.
2D aabb defined by two points
Simply put the algorithm for checking collisions against two aabbs (we'll call them C and D) is:

if Cmax is greater than Dmin AND Cmin is less than Dmax then they are colliding.


Sounds simple enough. I should also note that when I write "is greater (or less) than" I mean for all vector components (each or its coordinates).
Amazing as it may sound to an outsider this simple technique can also be used in 3D. The aabb's are still just defined by two points and you can still make the same checks for collision.

In fact, you can even use the same technique in 1D. You can think of an infinite line and then pick out two line segments (C and D) each line segment will have a point further to the left (its min) and a point further to the right (its max).
Now for the awesome part, aabbs and aabb collision checks also work in 4D. In fact they can work in 5D, 6D and 10582D as well! But uh, trying to visualise two tesseracts coming into contact with one another...
colliding ---------------------------- not colliding?

Indeed the maths works out fine but it is all a bit ambiguous to look at. So the maths is easy. Now I just need a way to convey this information to a general audience.

Wednesday, 25 April 2012

Thinking in Four Dimensions

No, not time.
It seems to be quite often I tell people I'm making a 4D application that they think "Fourth dimension? Just like Doc Brown!"
But no, what I'm talking about is four spatial dimensions, ie Length, Width, Depth and a fourth perpendicular to the afore mentioned three. "But Lachlan" you may ask "that doesn't seem physically possible"
And I say "That's technically a statement"
But you would be right in that statement in that it is not physically possible in our superfluous little 3D world. If you're interested then I recommend watching these two videos :

Still confused? Good then get lost nobody likes you anyway.
If you didn't watch because you're internet's too slow or you haven't grasped the concept of "multimedia" then her's a quick run down:

The number of dimensions of any given space can be determined by how many coordinates are needed to represent a single point in that space.

Starting with a zero dimensional space we have a single point. Don't let this confuse you into thinking it should be one dimensional as if it were 1D, we would NEED 1 coordinate to represent a point. But as we already only have an infinitely small point, we don't ANY coordinates to define a point. Because what other point could it be is my point.

Moving along we hit one dimensional space. 1D can be achieved by placing an infinite number of 0D spaces in a row. Your grade 2 maths teacher might call this new shape a "line", but who am I kidding? You didn't pass grade 2. 

Stretching out our single dimension perpendicular to the way we stretched the zero dimensions we end up with an amazing two dimensional square. If you would like to know what a square looks like, you can't... No I'm serious. Even if you cut a piece of paper perfectly (oh hey, alliteration) you wouldn't have a square, you'd have a prism.

Of course if we stacked this square infinitely on top of itself (perpendicular to previous two stackings) we end up with our glorious three dimensional space. It's good to be home. But wait a minute... There's more?

Why yes indeed there's more, there's many many more. But in order to follow the same pattern from going from one dimension to the next... It gets a bit... Tricky... It can take a while but can sort of visualise, or more so interpret four dimensional space by looking at how lower dimensions would need to interpret ours. A great tutorial on how to interpret 4D can be found here.

To be continued...